Behaviors overview Behaviors allow the user's interaction with the page to change the page, or to cause certain tasks to be performed. A behavior is a combination of an event and an action. For example, when the user moves the mouse over an image (an event), the image might highlight (an action). An action consists of prewritten JavaScript code that performs specific tasks, such as opening a browser window, playing a sound, or stopping a Shockwave movie.
Events are defined by browsers for each page element; for example, onMouseOver, onMouseOut, and onClick are events associated with links in most browsers, whereas onLoad is an event associated with images and the document body. Events are generated by browsers in response to user actions; for example, when a visitor to your page moves the pointer over a link, the browser generates an onMouseOver event, and calls the JavaScript function (if any) that you've associated with that event. The events that you can use to trigger a given action vary from browser to browser.
When attaching a behavior to a page element, you specify an action and the event that triggers it. Several actions can all be triggered by the same event, and you can specify the order in which the actions occur. Dreamweaver includes several behavior actions; additional actions can be found on the Dreamweaver Web site as well as on third-party developer sites. (See Downloading and installing third-party behaviors.) You can also write your own behavior actions if you are proficient in JavaScript.
There are two ways to
A rollover actually consists of two images: the primary image (the image displayed when the page first loads) and the rollover image (the image that appears when the pointer moves over the primary image).
When you create a rollover, both images must be the same size; if the images are not the same size, Dreamweaver automatically resizes the second image to match the properties of the first image. You should swap in an image that has the same dimensions (height and width) as the original in order to avoid distortion
Select the Preload Images option to load the new images into the browser's cache when the page is loaded. This prevents delays caused by downloading when it is time for the images to appear. If you left the Restore option selected while attaching Swap Image, you should never need to select the Swap Image Restore action manually
Swap Image; The Swap Image action swaps one image for another (by changing the SRC attribute of the IMG tag).changing an image in response to a different event (for example, a mouse click) or about changing a different image than the one being rolled over
Use this action to create button rollovers and other image effects (including swapping more than one image at a time).
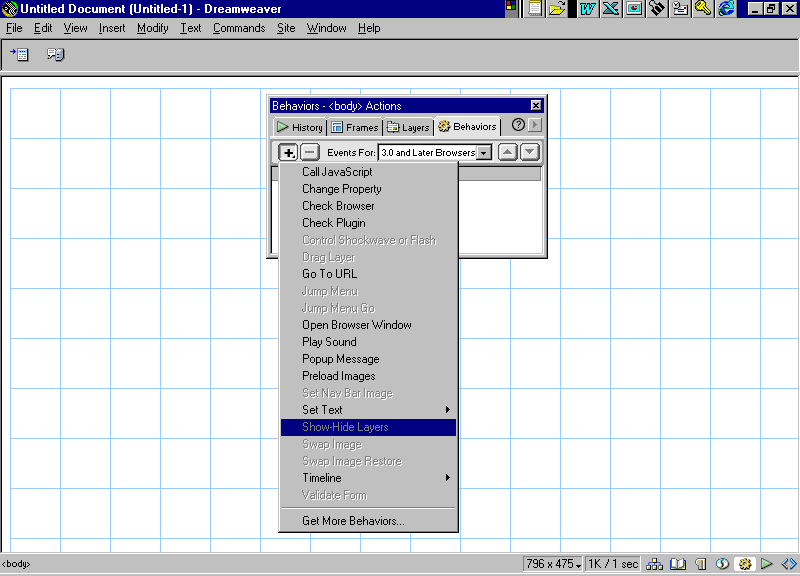
The Show-Hide Layers action shows, hides, or restores the default visibility of one or more layers. This action is useful for showing information as the user interacts with the page. For example, as the user rolls the mouse pointer over an image of a plant, you could show a layer that gives details about the plant's growing season and region, how much sun it needs, how large it can grow, and so on. Show-Hide Layers is also useful for creating a preload layerthat is, a large layer that obscures the contents of the page at first and then disappears when all the page components have finished loading.
When viewed in a Netscape Navigator browser window, layers may shrink to fit the content. To keep this from happening, add text or images to layers, or set layer clip values.
: 1 Choose Window > Layers to open the Layer palette. 2 In the row of the layer you're affecting, click in the eye-icon column until you set the desired visibility.
Dynamic HTML, or DHTML, refers to the ability to change style or positioning properties with a scripting language. Timelines use dynamic HTML to change the properties of layers and images in a series of frames over time. Use timelines to create animations that do not require any ActiveX controls, plugins, or Java applets. Timelines create animation by changing the position, size, visibility, and stacking order of a layer over time. Timelines are also useful for other actions that you want to occur after a page loads. For example, timelines can change the source file of an image, and they can execute behaviors at a particular time. The layer functions of timelines work only in 4.0 or later browsers. To see the JavaScript code generated by a timeline, open the HTML inspector. The timeline code is in the MM_initTimelines function, inside a SCRIPT tag in the HEAD of the document. When editing the HTML of a document containing timelines, be careful not to move, rename, or delete anything that a timeline refers to.
Use a tracing image as a guide to re-create a page design that was mocked up in a graphics application. A tracing image is a JPEG, GIF, or PNG image that is placed in the background of the Document window. You can hide the image, set its opacity, and change its position. The tracing image is visible only in Dreamweaver. It is never visible when you view the page in a browser. When the tracing image is visible, the background image and color are not visible in the Document window; however, they will be visible when the page is viewed in a browser.
or page color Use the Page Properties dialog box to define an image or color for the page background. If you use both an image and a background color, the color appears while the image downloads. If the background image contains any transparent pixels, the background color shows through.
Dreamweaver tiles (repeats) the background image if it does not fill the entire window, just as browsers do.
Contents LESSON 1: The Dreamweaver Basics The Dreamweaver Environment Viewing HTML and Download Time LESSON 2: Creating a Basic Web Page Formatting Text and Titling Web Pages Working with Images LESSON 3: Designing a Web Site Defining a Web Site Working with Templates LESSON 4: Working with Text Importing Text HTML Text Character Formatting Paragraph Formatting HTML Styles LESSON 5: Working with Links Links and Anchors LESSON 6: Working with Images Importing and Resizing Images Using Images as Links LESSON 7: Working with Tables Creating and Changing Tables Formatting Text in Tables Table Attributes LESSON 8: Building a Site with Frames Creating a Frameset Web Pages in Framesets Frame Link Destinations LESSON 9: Uploading a Web Site Check and Uploading the Site
Mac;Table of Contents LESSON 1: Dreamweaver Basics Internet access and HTML orientation The Dreamweaver environment Editing an existing page Viewing HTML and download time Creating and formatting text in a Web page Saving and titling Web pages Working with images LESSON 2: Designing and Site and Working with Text Defining a Web site Working with the Site window Working with templates Importing text HTML text Character formatting Paragraph formatting HTML styles LESSON 3: Importing images Resizing images Using images as links LESSON 4: Enhancing Web Sites with Tables and Frames, and Uploading Creating tables Changing table layout Formatting text in tables Table attributes Using tables for layout Creating a frameset Web pages in framesets Frame link destinations
Intermediate; LESSON 1: Rollovers and Navigation Bars Orientation to Rollovers Using the Insert Navigation Bar Tool
LESSON 2: Libraries Creating and Using a Library Item
LESSON 3: Head Elements Defining Head Elements
LESSON 4: Layers Orientation to Layers Using the Layers Palette Using Layers and Behaviors to Create Rollovers Embedding a Flash Movie into a Layer LESSON 5: Cascading Style Sheets Orientation to Cascading Style Sheets Applying a Cascading Style Sheet to Multiple Pages LESSON 6: Browser Targeting Testing Browser Compatibility
When you create a jump menu using Insert > Form Object > Jump Menu, Dreamweaver creates a menu object and attaches the appropriate behavior to it. There is usually no need to attach the Jump Menu action to an object by hand. Instead, double-click an existing Jump Menu action in the Behavior inspector to edit a jump menu, to change the location in which the linked file opens, or to add or change a menu selection prompt.
Image Properties
If you use a file, enter a path that is relative to your document. ).
Both Internet Explorer 4.0 and Netscape Navigator 4.0 support layers created using the DIV and SPAN tags. Only Navigator supports layers created with the LAYER and ILAYER tags
Nesting Makes a layer drawn within the boundaries of an existing layer a nested layer. Press Control (Windows) or Command (Macintosh) to temporarily change this setting while you're drawing a layer.
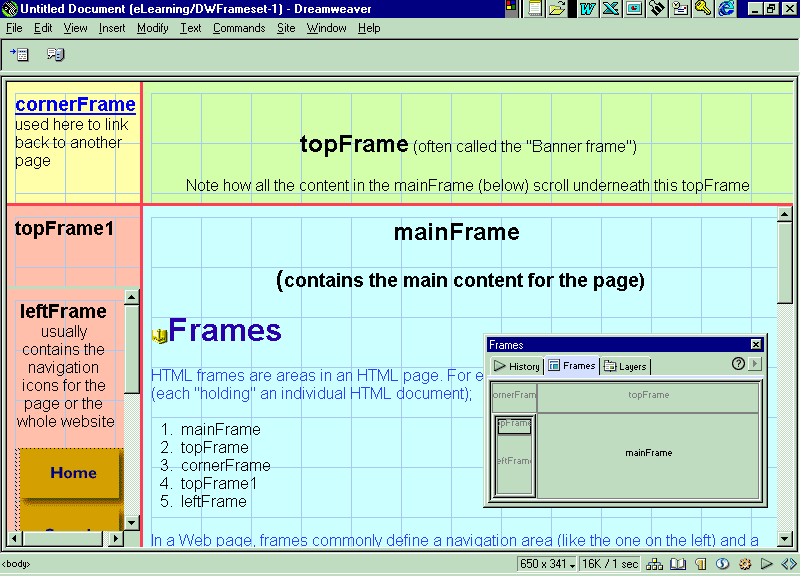
HTML frames are areas in an HTML page.
Objects
Forms
List/Menu properties To display list/menu properties in the Property inspector, select a list or pop-up menu in a form. See also Adding an object to a form. List/Menu Assigns a name to the list or menu. This field is required, and the name must be unique. Type Indicates whether the object is a pop-up menu or a scrolling list. For a list, you can set the height (the number of items displayed at once) and indicate whether the user can select multiple items from the list.